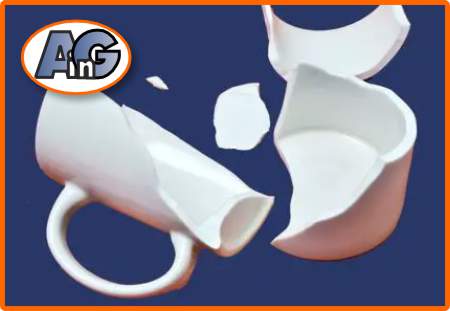
Do you have a ceramic coffee mug that has great emotional significance or one that brings back memories of a wonderful vacation? Breaking a favorite coffee mug can be a traumatic event but don’t worry – we can tell you how to repair a broken ceramic coffee mug in 2023.
A broken handle on a favorite coffee mug can be repaired using the following steps:
- Clean the broken parts very carefully
- Balance the parts ready for gluing
- Apply two-part epoxy adhesive
- Press firmly together & wipe off excess glue
- Leave overnight to set up
As an Amazon Associate, I earn from qualifying purchases.
If you would prefer to watch instead of reading a blog post – take a look at this YouTube video – and please subscribe to Artistry in Glass
Nearly 60 percent of people said in a survey by Heinz that they have an emotional attachment to a mug. More than 40 percent said their special kitchenware was “irreplaceable”, while about one-third told researchers that they’d be “devastated” were their mug to break. With this love of mugs, broken handles, and chips are well worth repairing – BUT if you have dropped your mug onto a tiled floor and busted it into a hundred pieces, then it will not be repairable (at least for reuse) and it will be time to dry your tears and move on.
Instructions for the repair of a broken ceramic mug
Remember that most repairs described below will restore your mug as a display item BUT not as a drinking vessel for coffee or tea.
As an Amazon Associate, I earn from qualifying purchases.
How to fix a broken handle on a coffee mug
If your coffee mug handle is broken into several pieces, each piece must be glued together before the final assembly. The steps are as follows:
Make sure that the broken surfaces are all perfectly clean before gluing. Even the tiniest impurity, a molecule of dirt, or a trace of old adhesive will prevent a perfect join. There is no more important step than making sure the broken edges are perfectly clean. The main reason is that grease attracts dirt, and dirt creates the unsightly black line on the join – a tell-tale sign that the repair was done by an amateur. Remember that even if you clean the pieces carefully, they can easily pick up dust from your fingers and the atmosphere. Then when you complete the repair and see the dreaded black line, you will want to blame the glue whereas it is grease from your own hands that has caused the problem.
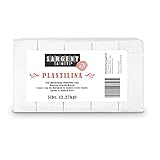

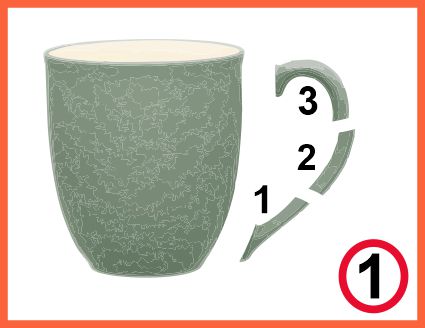
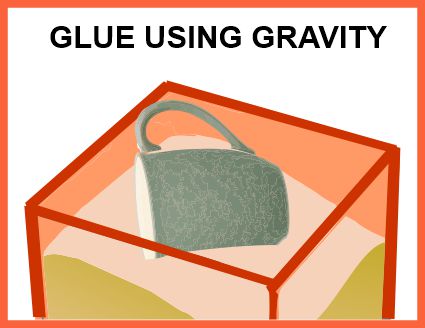
One of the most underestimated steps in the gluing process is to design a support system to hold the pieces in place while the glue sets up. Even the steadiest hand will find it hard to hold two pieces of china perfectly still for 3 or 4 minutes and the slightest micro-movement will ruin the glue bond and mean that you will have to start all over, cleaning the edges (acetone will clean off uncured epoxy). We use a modeling clay called Sargent Art Plastilina.
After arranging a support system, assuming your mug is china, apply a small amount of epoxy adhesive to one of the surfaces. If the mug is porous pottery or earthenware, you should apply a small amount of glue to both surfaces. Squeeze the two parts together firmly, wipe off any excess glue, and place the parts in their support to set up.
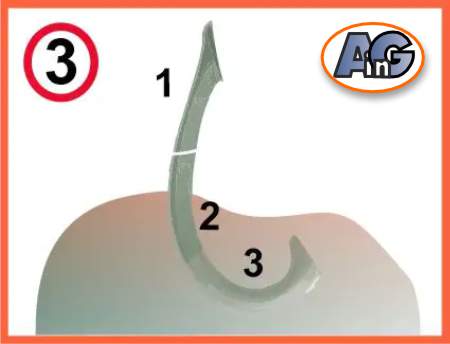
Allow the adhesive to set up for the appropriate time (with standard, 4-minute epoxy – 10 minutes or so is sufficient) then arrange the pieces in their support system and complete the second stage of the gluing process (drawing 3 above).
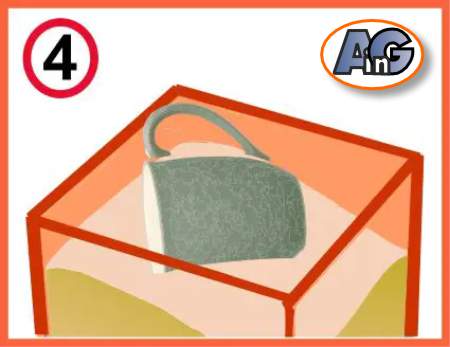
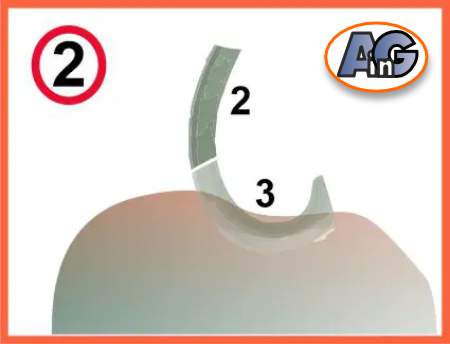
With multiple breaks, it’s best to let the repaired handle cure overnight so that the epoxy can achieve its full strength before the final gluing. After it is fully cured, prepare to attach the newly repaired handle to the mug by arranging a support system like the sandbox shown above.
See detailed instructions for gluing the handle below. If you want to be sure that the handle will not come off, consider the two options below for extra-strong gluing: biscuit joints and pin joints.
How to attach a handle to a broken ceramic coffee mug
If you have repaired your broken handle or if you simply have a broken handle – consider the following options for repair.
Method 1: Simple Attachment
Using the standard gluing instructions of careful cleaning & application of adhesive, use strong 2-part epoxy, press the handle firmly into place, wipe off the excess glue, and balance the parts in a sandbox or on “Plastilina” so that the glue can set up and achieve full strength overnight.
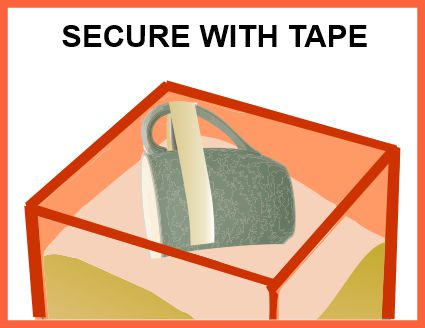
If the join is “wobbly” and the handle does not seem to fit perfectly, or, simply for extra security, you can make sure the handle does not move by adding pressure-sensitive tape, (as always, do not use tape on a gilded surface (it may take off the gold).
If you have followed our instructions carefully the newly repaired handle should fit exactly on the mug. If it doesn’t fit, it’s likely that you have made the mistake common to the inexperienced restorer: using too much glue. In this case, your options are either to start all over – put the mug in a ziplock bag, half full of acetone and soak off the adhesive, OR carefully grind off a little china with a Dremel tool OR, throw your hands in the air, give up and buy a new mug.
If you have a pottery mug (rather than ceramic or vitreous china), two extra-strong attachment methods are the “biscuit” joint and the “Pinned” joint.
Method 2: using “biscuit” joints

Biscuit joints are used by woodworkers for strengthening glued joints. Use this equivalent method in ceramics if you would like an extra-strong joint. This method is optional and we recommend it for earthenware or low-fired pottery rather than vitreous bone china. Use a Dremel or similar drill with a diamond disk to grind shallow grooves in the mug and in the corresponding positions on the detached handle.
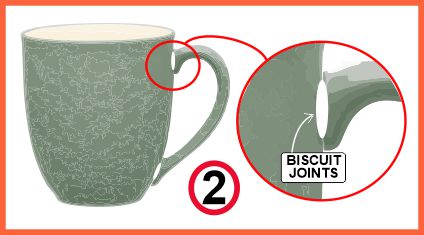
Drawing # 2 above shows how adhesive in the opposing grooves keys together forming a biscuit joint strengthening the bond. The gluing should be done, as usual using a sandbox or other support method.
Method 3: using pin joints
For the perfectionist, aiming for a super-strong join: the use of pins is the ultimate joining method. This is best for softer, semi-porous pottery or earthenware mugs where a diamond bit in a Dremel or similar drill is used to drill a 1/8″ diameter hole.
Using your hand-eye coordination, drill a hole in the mug handle making sure it coincides as closely as possible in position and angle with the hole in the mug. The hole only needs to be 3/16″ to 1/4″ deep to be effective.
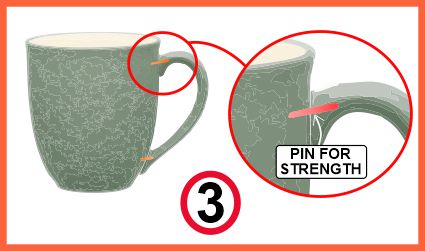
In order to allow some leeway in case the holes are not exactly lined up, you can use a pin whittled down out of a bamboo or wooden toothpick to a diameter a little under 1/8″. Practice pinning the handle to the mug in a “dry run”. Once you are confident that the fit is perfect, fill the holes with epoxy and push the parts firmly together. Then, rest the mug in its customary sandbox or support to set up.
Interested in glass tabletops? Follow this post to see if your glass top should be tempered.
How to make a new handle for your broken ceramic coffee mug
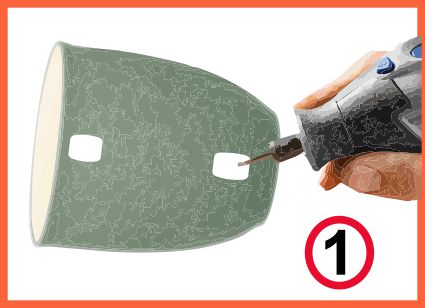
When a favorite mug is broken, it occasionally happens that the handle is lost. In other cases, the handle may be too badly shattered to be repaired. Do not worry: follow these steps to create a brand new handle:
- Bend #10 gauge wire to the shape of the handle
- Attach the wire to the mug with epoxy adhesive
- Mold epoxy putty to the wire armature
- Sand and paint the putty to match the mug
Here are the steps explained in detail:

Using an internet image, or your best memory, trace the shape of the missing handle.
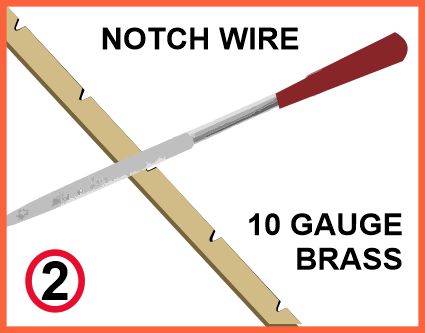
To help the epoxy putty to stick to the wire, it is helpful, but not essential, to make small notches in the brass wire using a metal file.
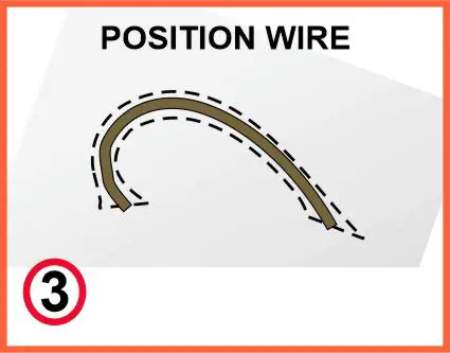
Bend the brass wire to the shape of the handle, using your sketch as a guide.
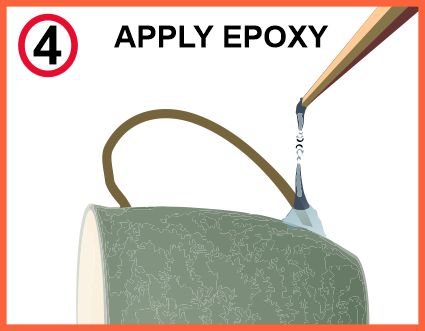
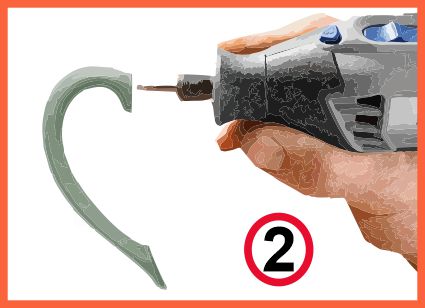
Drip quick-setting 2-part epoxy down onto the junction between the wire and the mug. As the epoxy starts to stiffen, mold it to enclose the wire.
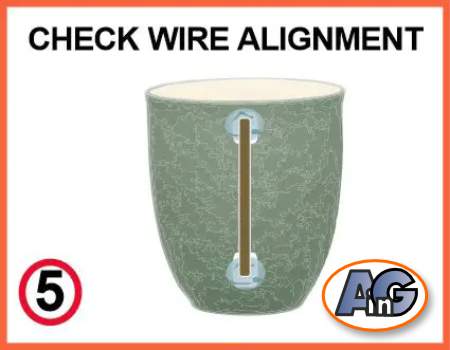
Before the epoxy has set up, take a look at the wire from the side view and fine-tune its position to make sure it is aligned correctly.
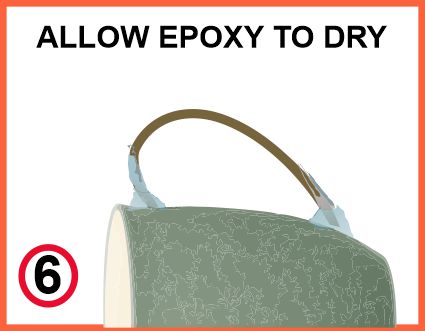
Leave the wire armature to set up overnight (always exercise patience with repairs) – epoxy achieves its full strength over a period of 12 hours.
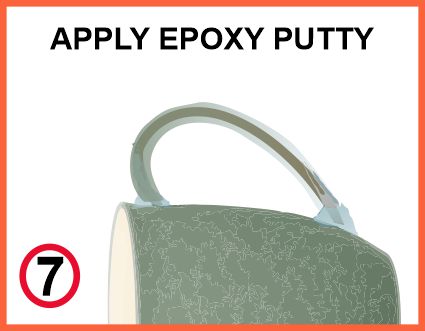


Mix 2-part epoxy putty thoroughly. We recommend Apoxie Sculpt which comes in natural (gray), white, or even multicolor packs. (As an option, the putty can be tinted to match the color of the mug, or painted to match later}. Gradually build up the handle by adding putty.
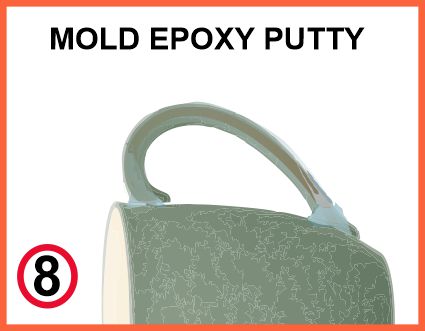
Carefully mold and smooth the epoxy putty to match the shape of the handle. With Apoxie Sculpt, you have about 30 minutes of effective working time as the putty gradually hardens. Use a spatula or your fingers with a little water to achieve a smooth surface, Remember, the closer you get to the correct shape, the less sanding you will have to do later.

Sand the handle smooth and to the exact shape required. If the putty has not been tinted to match the color of the mug, you will need to paint it. Use your favorite acrylic paints and finish by spraying the handle with clear gloss varnish.

If you have followed these steps correctly, your favorite mug will be strong enough to be used for tea or coffee – but take care – wash only by hand (do not use the dishwasher) and don’t use abrasive cleaners or scotch pads on the handle.
How to fix a chip in a coffee mug
With constant use and washing in the dishwasher, your favorite mug can easily get chipped. A chip looks bad and also if it is left unattended it can develop into a crack or harbor germs – so it’s best to fix the chip using these simple steps:
- Roughen the chip with a file & clean it thoroughly
- Mix clear epoxy and tint it to match the mug
- Drop just enough epoxy to fill the chip
- After the epoxy dries, sand it smooth
- Add clear glass varnish or nail polish to seal
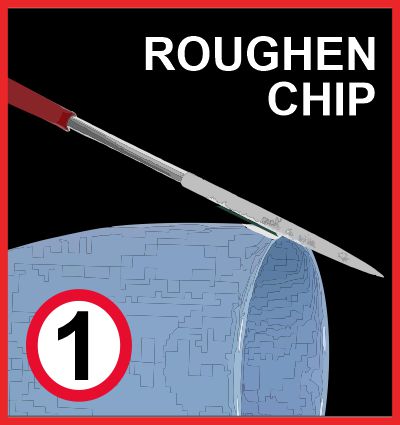
To provide a grip for the epoxy it is a good idea to roughen the surface of the chip with a file or sandpaper. Adventurous restorers can use a Dremel tool with a diamond wheel to cut fine grooves.
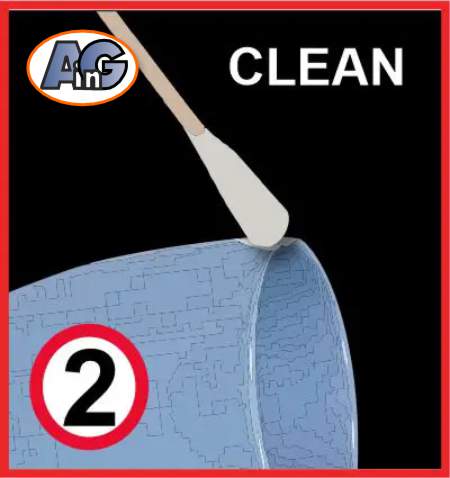
Be sure to clean the chip carefully with a Q-tip and alcohol or acetone before proceeding. (these fluids evaporate without leaving a residue).
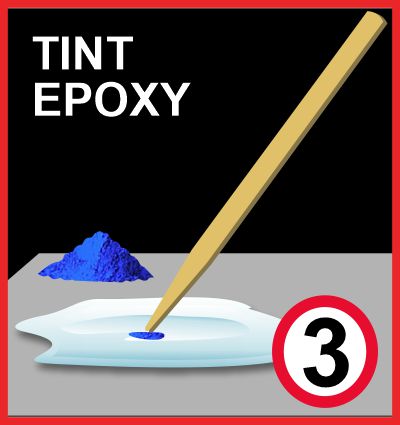
Using a 5-minute clear epoxy like HFT, PC Clear or Devcon brands mix a very small amount of dry pigment or colored chalk to tint one-half of the epoxy to match the color of the china. When you have matched the color, combine the two parts of the epoxy to activate the adhesive.

Drop just enough tinted epoxy onto the mug to fill the chip level with the surface. The surface tension of the glue will make it bulge up slightly higher than ideal, but with practice, you will be able to judge the optimum amount
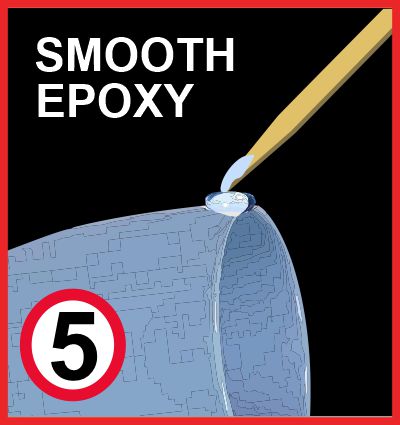
Using the 4 minutes available before the glue hardens, manipulate the adhesive to fill the chip as closely as possible.

Leave the epoxy to set up overnight then sand the excess epoxy using appropriate grits to flatten and smooth the glue level with the mug.
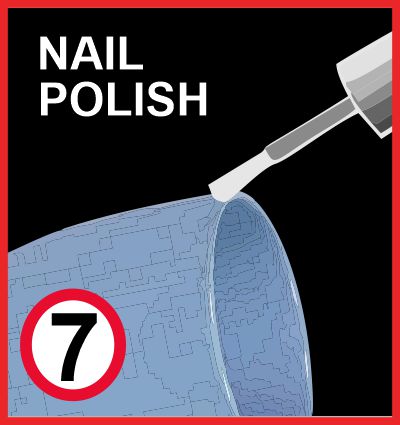
An optional step is to apply nail polish or spray varnish to the epoxy. This will seal the roughened epoxy glue and match the gloss finish of the china mug.

Your favorite mug with its repaired chip is now strong enough to withstand normal use – but take care not to scour the chipped area with abrasive cleaners. Time for a delicious cup of coffee or tea!
How to fix a leaking mug
Occasionally a treasured mug will develop an annoying leak or slight dribble – making it unusable. This simple tip will fix most leaks and will enable you to continue using your favorite drinking vessel.
To fix a stubborn leak use transparent DAP silicone adhesive which is microwave, dishwasher-safe, and non-toxic. Squidge the DAP adhesive firmly into the crack from both sides, wipe off the excess, allow it to dry overnight, and get ready for a stimulating cup of coffee.
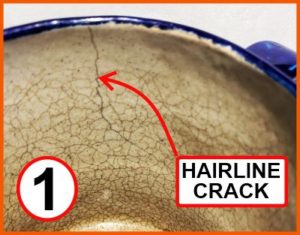
Hairline cracks are common in your beloved Mexican, Spanish, or Italian earthenware mugs. (Earthenware is a low-fired, slightly porous form of pottery that is softer than china and bone china). DAP adhesive is the recommend non-toxic adhesive to fill micro-cracks and stop your leaks.
How to fix a badly smashed mug
A cherished mug that is broken into numerous pieces really is beyond repair by an amateur. You have two options available: one is to bring it to Artistry in Glass where our experts can perform an invisible repair BUT remember it cannot be used but becomes a display piece for the china cabinet. The other possibility, if the mug is a famous pattern, is to search online for a replacement.
Unique Mirror Resources from Artistry in Glass
Mirror Design & layout
- How are mirrors made?
- What is a beveled mirror?
- What is a two-way mirror?
- Best mirrors for bedrooms
- How to size and position your wall mirror
- How to order custom etched mirrors
- Best places to hang dining room mirrors
- How much do wall mirrors cost?
- Shop the MIRROR Family Package
Mirror Installation & Removal
- How to hang a wall mirror
- How to frame a builder’s grade bathroom mirror
- How to hang a frameless mirror with glue
- Best clips for hanging mirrors
- How to attach a mirror to a closet door
- How to remove a mirror glued to the wall
Mirror Repair & Restoration
- Should I resilver my antique mirror?
- Can I repair scratched mirror silvering?
- What is the best spray paint for mirror silvering?
- How to fix a cracked mirror
- How to repair a broken mirror frame
Artistry in Glass was your source for antique repair in Tucson
Check out this amazing selection of informative articles:-
- Where can I get antiques repaired?
- Are broken antiques worth fixing?
- How to fix a broken picture frame
- How to repair a broken china plate
- How to repair a broken china teapot
- How to fix a broken marble slab
- How to repair a broken china coffee mug
- How to repair a 2000-year-old sculpture
- All about repairing stained-glass lampshades
- How to care for your stained glass skylight
- How to repair Dalle de Verre
- Is stained glass worth repairing?
- To repair or toss out?
- Tucson crystal & china repair a division of Artistry in Glass
- What to do with broken antiques
- Is lead crystal dangerous?
- Repairing an antique Mexican statue
- Repairing religious statues
- The history of Swarovski crystal figurines
- How to find the value of a Swarovski Crystal figurine
- Have Swarovski crystal figurines lost value since 2009?
- How to collect Swarovski annual ornaments
- How to display Swarovski crystal figurines
- How to authenticate a Swarovski crystal figurine
- How to display Swarovski annual ornaments
- How to clean Swarovski crystal figurines
- How to repair a Swarovski crystal mouse
- How to repair a Swarovski annual ornament
- How to repair a Swarovski crystal train set
- Fixing broken wine glass stems
- How to clean cloudy glasses
- Why do wine glasses have stems?
- Swarovski Crystal Figurines
- How to repair a chip in a wine glass
- How to fix a scratched glass tabletop
- How to replace a broken patio tabletop
As an Amazon Associate, I earn from qualifying purchases.
