Many bathrooms have unframed builders-grade bathroom mirrors over the vanity. Removing these mirrors is difficult because they are often glued to the wall – so the most economical solution is to spruce up the old mirror by attaching a frame. Learn the secrets of in-situ mirror framing in this informative post.
A handy homeowner can frame a bathroom wall mirror for less than $25.00 using molding from a home-improvement center and construction adhesive. The three main types of frames are: mitered, square-cornered, and butted and each can be installed following the simple steps described in this post:
- Measure your mirror
- Select your molding
- Cut molding to size
- Attach molding to mirror
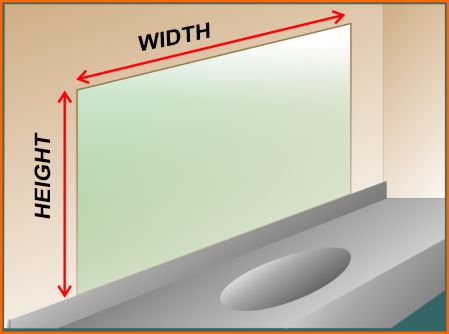
Measure your mirror to determine how many feet of molding you will need.
Decide on your style of framing
Using store-bought molding, there are three main styles of frame design to choose from:-
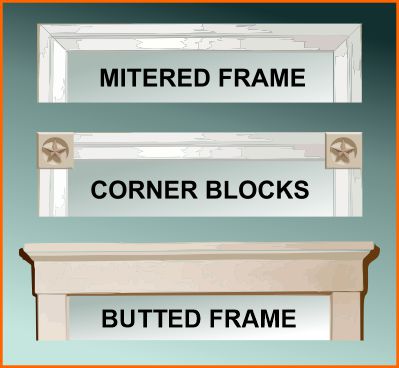
- Mitered Frame – the simplest and most affordable frame type, uses a single type of molding but requires that you cut accurate 45-degree angles (miters) for the corners.
- A Corner Block frame increases the cost of materials but add style and dimension to your frame, as well as eliminating the need to cut tricky miter joints
- A butted frame also avoids mitering and adds a special design statement to your mirror. Butted frames are common as casing styles for traditional Federal or Georgian doors. They are also, with simpler molding, characteristic of the popular Craftsman or Art and Craft styles.
Consider your design style, your woodworking abilities, and your budget (frugal or extravagant) to choose your style of frame.
As an Amazon Associate, I earn from qualifying purchases.
Mitered Frames
The least expensive solution is to buy molding and cut 45-degree miter joints to build the frame. Numerous types of molding are available from home-improvement stores like at Home Depot and Lowes.
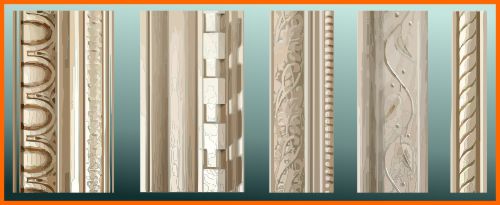
There is also a great selection offered by Wayfair on their website:-
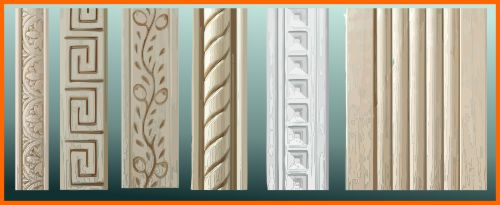
Use your imagination to choose the molding style most appropriate to your home’s interior design. Remember that you can paint your molding any color you choose.
Fun Fact: is it “Molding” or “Moulding”?
Wood or MDF?
Should I choose MDF or wood molding for my mirror framing?
MDF (medium-density fiberboard) has the following advantages over wood molding: it is less expensive, it is seldom warped or twisted, it comes primed ready to paint and it cuts without splitting or splintering. So we recommend MDF if you plan to paint your frame. Choose wood if you want a traditional look and stain to match your interior decor.
Study the molding profile
Before making your final choice, consider the molding profiles shown below and note that picture frame molding is not suitable for gluing to your mirror because of the “rabbet” (see image below).
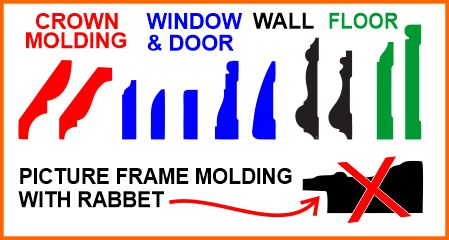
Most molding types, including window & door molding, wall, and floor molding can be used for in-situ mirror framing. You can even use crown molding for an extra decorative effect – but note that the 45-degree edge profile means that you need to overlap the mirror as shown below:
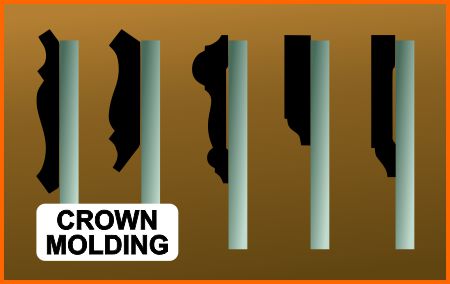

Overlapping your frame
Many builder’s grade mirrors have seamed rather than polished or beveled edges so it is very important to hide the unfinished mirror edge. It also makes a much more professional and cleaner look if the frame completely covers the mirror (on all sides).
OK, whether you have chosen MDF or wood molding you are ready to cut the miter joints. Always remember the woodworker’s adage “measure twice – cut once”.
Cutting the miter joints
Cutting a perfect 45-degree miter is not the easiest task for a woodworking novice but do not be afraid – you can always fine-tune the angles with a sander or fill any gaps with putty.
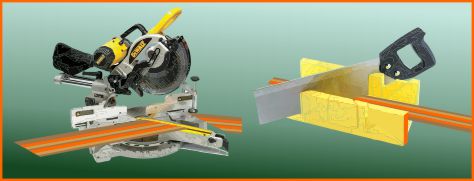
If you plan to do any amount of woodworking, an essential tool is a miter saw (above left) – so why not purchase the best? A Dewalt miter saw, available here on Amazon. For handymen or women planning to make only a single frame, then a miter box & saw like this one from Amazon is perfectly adequate.
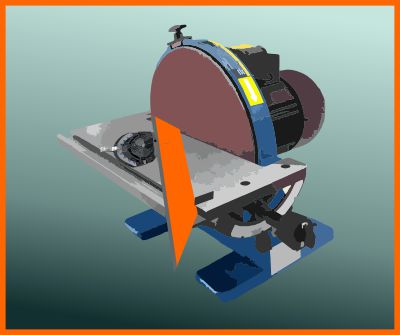
Picture framer’s hack
For perfecting your crooked 45-degree angles – use a disc-sander with an angle gauge to fine-tune the angles previously cut on the miter saw.
Painting or staining the frame
After sanding the joints and checking for fit, it is time to paint or stain your frame. If your molding is MDF it will already be primed with white paint, ready for your custom color. With soft or hardwood molding you have the choice to paint or stain.
Important tip! Paint the back of the frame because this will reflect in the mirror and any imperfections will show up. It is really only necessary to paint or stain the inside inch or so of the reverse side – the rest will not show.
Important preparatory step: change the mirror clips (if necessary)
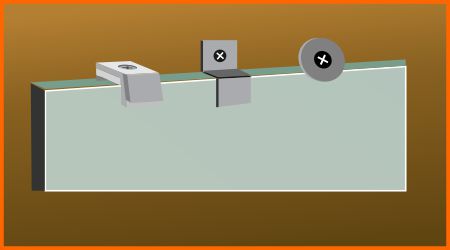
If your mirror is held in place with decorative mirror clips they will likely get in the way of the molding. You can either notch the back of the molding OR you can replace the high-profile clips with simple “Z” clips (like these available on Amazon) or improvise by using a large washer (1″ diameter) with a screw to secure the mirror.

Mirrors are potentially dangerous. They can break into sharp, life-threatening shards. Never take chances with the welfare and safety of your family. Make sure the mirror is securely attached to the wall. If in doubt consult a professional.
Attaching the frame to the mirror
The final exciting stage is attaching your beautiful new frame to the mirror. Following these steps:
- Clean the mirror with Windex or similar glass cleaner – glue will not stick to a dirty surface.
- Make sure the paint or stain on your molding is perfectly dry.
- Do a “dry-run” to make sure the molding fits.
- Apply Liquid Nails or similar construction adhesive.
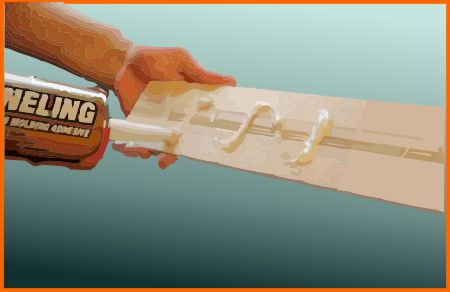
Start with the lower molding (often supported on the bathroom backsplash) and apply a generous bead of adhesive. Take care not to go too close to the edge to avoid squeeze-out and glue clean-up.
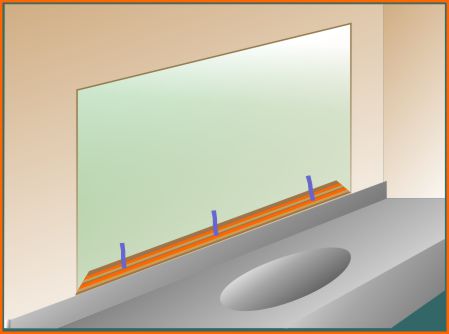
Put the molding in place, press hard and make small adjustments if necessary to make sure it is centered. An alternative fixing method is to use double-sided tape but this requires nerves of steel and a sure hand because once stuck, the molding cannot be re-positioned.
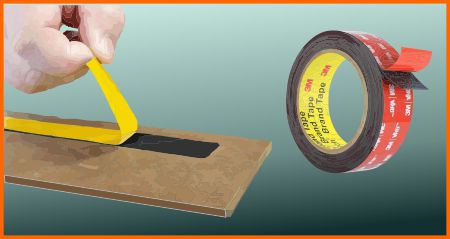
High-quality double-sided tape, like this 3-M brand available on Amazon, is very strong and also less messy to use than adhesive. But, it cannot easily be re-positioned if you stick the molding on crooked. We recommend tape if you have good hand-eye coordination and also an assistant to help with the positioning.
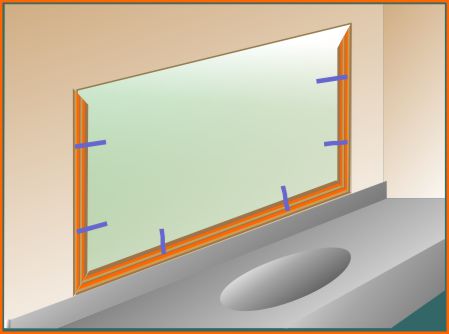
Using construction adhesive or double-sided tape, carefully attach the side moldings. With adhesive, press the molding firmly into place and secure with tape if necessary.
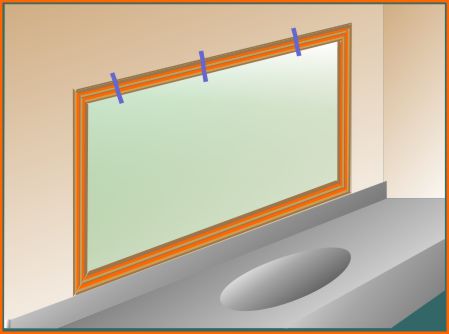
Finally, add the top molding. Fill any small gaps with caulking if necessary and your beautiful frame is complete
Corner Block Frames
For a small additional cost in materials, you can upgrade your basic frame and add style by adding corner blocks (sometimes called rosettes).
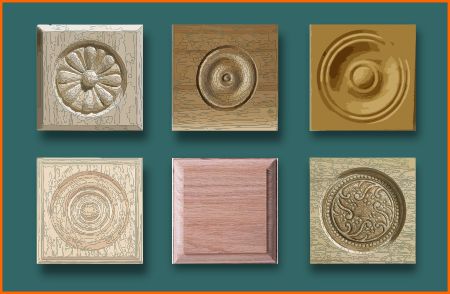
Corner blacks are found in the ornamental molding section of home-improvement websites. They range from 2 1/2″ to 4″ square and, used in the corners of the frame, they avoid the tricky issue of 45-degree miter joints. Corner blocks are a little difficult to search for online so read this info for search tips.
Choose your corner blacks and molding, cut to the appropriate lengths, and follow the same preparation and gluing instructions as explained above for mitered frames.
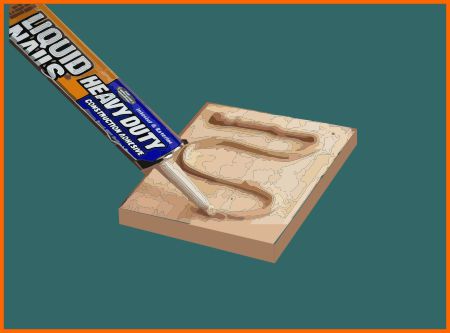
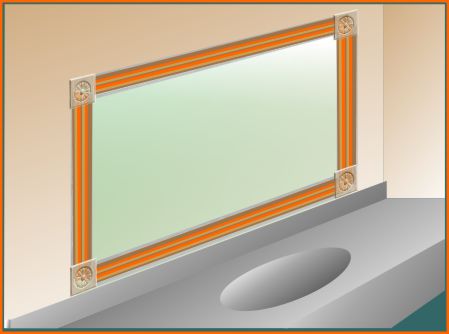
Corner blocks are a great way to add style to your frames – follow this link to learn more about where to find them.
Butted Frame
A butted frame is the ultimate in do-it-yourself mirror framing, bringing the style of classical casings to your bathroom upgrade. They are especially appropriate in traditional, Tuscan and Craftsman-style interiors.
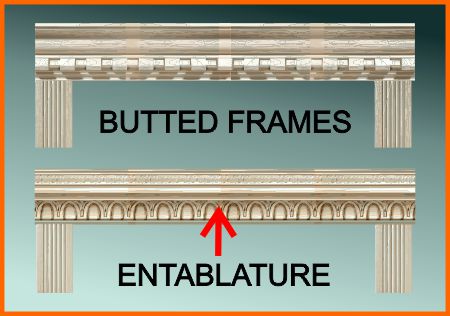
Use your creativity to choose molding for your butted mirror frame. The top rail is traditionally called the “entablature” following the nomenclature of classical architecture.
Very elaborate entablatures can be constructed by combining various types of molding to build up an interesting profile. As an alternative, a fancy crown molding may be the effect you are looking for.
Some entablatures may need some extra woodworking skills to perfect. Remember that the side of the thick molding may be visible and will have to finished (sanded, stained, and/or painted).
Use common sense to make your luxurious butted frame and follow the same steps for mitered frames to glue your frame to the mirror.
What are “Corner Blocks”?
Corner blocks, also sometimes called “rosettes” are 2 1/2 to 3 1/2 inches square, carved wooden (oak) blocks found in the “ornamental molding” categories of home-improvement stores.
Home Depot calls them “Corner Blocks”: Lowes calls them “Hardwood Rosettes”, while on the Wayfair website they are called “Wood Rosettes”, on Etsy they are known as “Rosette Appliques” (Etsy), and “Square Rosettes” at Architectural Depot.
Fun fact: Molding or Moulding?
“Moulding” is the original English spelling for the wooden strips used to decorate and finish, doors, windows, and rooms. This spelling is still used in the UK, Australia, New Zealand, Canada, India, and Eire, but has been replaced by “molding” in the US (although, interestingly, both Home Depot and Lowes use “moulding” – possibly as an attempt to appear snobbishly upper-class?).
“Mold” is also the preferred US spelling for the type of fungus that is called “Mould” in the UK.
Unique Mirror Resources from Artistry in Glass
Mirror Design & layout
- How are mirrors made?
- What is a beveled mirror?
- What is a two-way mirror?
- Best mirrors for bedrooms
- How to size and position your wall mirror
- How to order custom etched mirrors
- Best places to hang dining room mirrors
- How much do wall mirrors cost?
- Shop the MIRROR Family Package
Mirror Installation & Removal
- How to hang a wall mirror
- How to frame a builder’s grade bathroom mirror
- How to hang a frameless mirror with glue
- Best clips for hanging mirrors
- How to attach a mirror to a closet door
- How to remove a mirror glued to the wall
Mirror Repair & Restoration
- Should I resilver my antique mirror?
- Can I repair scratched mirror silvering?
- What is the best spray paint for mirror silvering?
- How to fix a cracked mirror
- How to repair a broken mirror frame
Artistry in Glass was your source for antique repair in Tucson
Check out this amazing selection of informative articles:-
- Where can I get antiques repaired?
- Are broken antiques worth fixing?
- How to fix a broken picture frame
- How to repair a broken china plate
- How to repair a broken china teapot
- How to fix a broken marble slab
- How to repair a broken china coffee mug
- How to repair a 2000-year-old sculpture
- All about repairing stained-glass lampshades
- How to care for your stained glass skylight
- How to repair Dalle de Verre
- Is stained glass worth repairing?
- To repair or toss out?
- Tucson crystal & china repair a division of Artistry in Glass
- What to do with broken antiques
- Is lead crystal dangerous?
- Repairing an antique Mexican statue
- Repairing religious statues
- The history of Swarovski crystal figurines
- How to find the value of a Swarovski Crystal figurine
- Have Swarovski crystal figurines lost value since 2009?
- How to collect Swarovski annual ornaments
- How to display Swarovski crystal figurines
- How to authenticate a Swarovski crystal figurine
- How to display Swarovski annual ornaments
- How to clean Swarovski crystal figurines
- How to repair a Swarovski crystal mouse
- How to repair a Swarovski annual ornament
- How to repair a Swarovski crystal train set
- Fixing broken wine glass stems
- How to clean cloudy glasses
- Why do wine glasses have stems?
- Swarovski Crystal Figurines
- How to repair a chip in a wine glass
- How to fix a scratched glass tabletop
- How to replace a broken patio tabletop
