
Your favorite mirror has fallen off the wall and cracked. Many misleading websites claim that broken mirrors can be fixed but the fact is that they nearly all need to be replaced with new mirror. This article explains how to replace a broken mirror.
Cracked mirrors cannot be successfully glued back together so you must carefully remove the broken mirror, order a new one from the glass shop, and install it. Use the simple steps explained in this article.
There are a few occasions when gluing broken mirror fragments may be worthwhile. These include very valuable or historic mirrors with elaborate engraving where preservation of the original is important OR small mirrors with small a crack (say in the corner). In nearly every other case, the cracked mirror must be replaced with a new one.
How do mirrors get cracked?
Mirrors are, of course, made of glass and glass is brittle – it will break if subjected to impact with a hard object. Cracked mirrors are the result of stress – if a mirror falls off the wall or is hit by a hard object like a baseball it generally fails catastrophically – breaking into jagged shards. Note that this damage is quite different from the small dings caused by pieces of gravel hitting a windscreen.
Also, note that a broken mirror does not guarantee seven years of bad luck – this is a superstition dating back to Roman times.
Causes of broken mirrors

Fractures caused by impacts from hard objects
Careful examination shows that this mirror has been deliberately vandalized: it has been attacked with a sharp object in at least three places. The mirror must be replaced with a new one.

Edge cracks caused by clumsy hammering
Typical stress fractures are caused by this mistake in hammering-in a brad to secure a mirror in the frame.
To guard against mirror cracking, we recommend flat “framing points” instead of nails or brads.
How to fix cracked mirrors
Note that we have detailed advice and instructions on what to do if you have damaged silvering or black edge on your mirrors. Here we describe the steps involved in replacing a broken mirror and putting a new mirror in the frame.

Mirror glass is sharp and dangerous – you can replace a small mirror if you are careful but with large, heavy mirrors, please consult a glass professional if you are nervous or uncertain.
As an Amazon Associate, I earn from qualifying purchases.
Important safety considerations


For extra safety, especially with larger mirrors, apply masking or similar tape to stabilize the dangerous glass shards and minimize the chances of getting cut.
Preparing to remove the broken mirror

In order to access the mirror, remove the “D” rings and hanging wire. If this hardware is in good condition, save it for later re-installation.

Antique Mirrors
Mirrors made in the 18th and 19th centuries very often have rough boards of pine as protection for the silvering. These are valuable evidence for the antiquity of the furniture and, in the interests of historical authenticity, should be removed carefully and saved for later re-installation. If the backing boards splinter – take the time to repair them using wood glue.
Most late 19th Century and 20th Century mirrors are protected with brown paper – follow these instructions to remove:


Remove this paper using a razor blade or utility knife then peel it back to reveal the reverse side of the mirror.
Removing the broken mirror

Mirrors are held in place by brads, nails, or various types of glazing points. Using pliers, pull out these metal anchors and carefully remove the broken mirror. Take care when disposing of the broken mirror shards – they cannot be recycled but are extremely sharp and should be boxed in cardboard or similar containers to safeguard garbage disposers against injury.
Measure and purchase a new mirror
Once the broken mirror fragments are removed you are ready to measure the frame and buy a new mirror. Follow these important tips:
- Size of the mirror – do not make the mirror too big – there is no need to jam the mirror tightly into the frame. Take the frame dimensions and subtract 1/4″ from the width and the length. This will give you a space of 1/8″ all round.
- Thickness of the mirror. If you are replacing an old (pre-1950s) mirror it may be 5/16″ thick – considerably heavier than a 1/4″ mirror. Modern mirror comes in 1/8″, 3/16″ and 1/4″ thicknesses. Our advice is to use 1/8″ thick for smaller mirrors – say up to 24″ square, and 3/16″ thick for larger mirrors – these thicknesses are plently strong enough for framed mirrors and will save you a lot of weight, making hanging on the wall easier.
- Beveled or plain mirror. Beveled mirrors are about double the price of plain mirrors because of the extra labor involved in doing the edgework. So, if you are on a budget choose plain mirror. Normally you will only order beveled mirror if you are replacing a broken piece of beveled mirror. Read this post for everything you need to know about beveled mirrors.
- Save money by using the tips explained in this post to get the best pricing from your mirror shop. In particular, unless your are ordering beveled mirror, you can save money by ordering “clean cut or seamed” mirror rather than polished because the edge of the mirror will not show (see this post to learn all about clean cut, seamed, and polished).
Installing the new mirror in the frame
We do not recommend using brads because of the possibility of cracking your new mirror by clumsy hammering but if you have to use brads follow the precautions below:-

Basic (amateur) method
Using small ( 1/2″ or 3/4″) wire brads
To guide the brad into the frame at the correct angle and to avoid scratching the mirror silvering, a small piece of protective card (a business card is ideal) is a good safety measure.
Detailed brad-hammering tip: if you are using brads in a new oak (or other hardwood) frame, use a brad chucked into your drill to make a pilot hole.
Professional methods using glazing points
If you intend to install many mirrors or to take up home picture framing – or even if you have money to spare and just love tools – try these two handy gadgets to make mirror work super easy and safe:

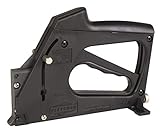
Fletcher Frame Master Point Driver
If you plan to reframe several mirrors or get into the picture framing business – this Fletcher-Terry point driver is an essential tool. The flat metal points permanently hold mirrors and artwork in place without damage to the materials.
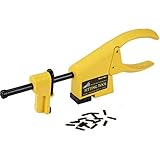
Logan Pro-Framing F400-1 Fitting Tool
Another useful tool for any do-it-yourself framer or mirror installer, the fitting tool, also known as a point driver, secures flat framing points or even brads into wooden frames. Safer than the old-fashioned hammering method, the jaws adjust to any frame width and powerfully but gently pull the metal anchors into place.
Final steps
Once your new mirror is secured, repeat the initial steps in reverse order to complete the job:
- For an antique mirror, carefully replace the protective wood boards.
- For more modern mirrors, cut medium-strength brown wrapping paper to size and use Elmers or wood glue to attach it to the back of the mirror. (Put the glue on the back of the wooden frame – not on the mirror).
- Replace the “D” rings and piano wire so that you can rehang your beautiful mirror.
- Safety reminder! Check that the wire and “D” rings are safe and not frayed. Replacement hardware is available at very reasonable prices – for example this wire and hook system.
Conclusions
If you have a treasured or attractive framed mirror, and you are just slightly handy, then you can easily replace broken mirrors using the steps outlined in this article. Remember to take care not to get cut and also – not to be misled by deceptive sites that claim to be able to repair broken mirrors – see below for details!
Exceptions – some mirrors are worth gluing

Expensive Venetian-style mirrors
If you are unlucky enough to crack part of an elaborately engraved mirror such as the Venetian example shown here – it would be worth gluing the pieces together. Artistry in Glass has mastered the technique of mirror gluing using optically clear adhesive.
Warning about deceptive websites!
Do not believe high-ranking websites that claim you can fix a cracked mirror with windshield repair resin or epoxy. Cracks, pits, and dings in vehicle windshields are quite different categories of damage compared to the broken shards of a busted wall mirror. Beware – please disregard misleading sites like these.

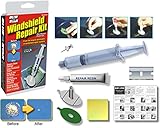
Blue-Star Windshield Repair Kit
Inexpensive kits like these include special UV-activated resin that sets up in sunlight and, with the aid of a syringe, fills the micro-fractures and heals and repairs small cracks in windshields. Deceptive websites make the reader believe that this method will work on cracked wall mirrors – but it is not true! Shattered wall mirrors need to be replaced.
Unique Mirror Resources from Artistry in Glass
Mirror Design & layout
- How are mirrors made?
- What is a beveled mirror?
- What is a two-way mirror?
- Best mirrors for bedrooms
- How to size and position your wall mirror
- How to order custom etched mirrors
- Best places to hang dining room mirrors
- How much do wall mirrors cost?
- Shop the MIRROR Family Package
Mirror Installation & Removal
- How to hang a wall mirror
- How to frame a builder’s grade bathroom mirror
- How to hang a frameless mirror with glue
- Best clips for hanging mirrors
- How to attach a mirror to a closet door
- How to remove a mirror glued to the wall
Mirror Repair & Restoration
- Should I resilver my antique mirror?
- Can I repair scratched mirror silvering?
- What is the best spray paint for mirror silvering?
- How to fix a cracked mirror
- How to repair a broken mirror frame
Artistry in Glass is your source for antique repair in Tucson
We also specialize in the restoration of a wide range of antiques and collectibles – check out this amazing selection of informative articles:-
- How to repair a broken china plate
- How to repair a broken china teapot
- How to fix a broken marble slab
- How to repair a broken china coffee mug
- All about repairing stained-glass lampshades
- How to care for your stained glass skylight
- Is stained glass worth repairing?
- To repair or toss out?
- Tucson crystal & china repair a division of Artistry in Glass
- What to do with broken antiques