A picture frame protects your artwork and serves as a beautiful transition between the painting and your room’s architecture and furnishing. If your treasured frame has been damaged – or if you have bought an antique frame at an estate sale – how do you find out if your broken picture frame is worth repairing?
Carved or gilded frames are worth restoring as long as the damage is not too severe. The steps are: remove the artwork, clean off the dirt, reglue the corners, replace missing veneer and gesso, refinish the frame then re-install your picture.
Examine your picture frame to evaluate the damage. Small photo frames are not worth fixing but if you have a decorative, carved, or gesso frame with a gold leaf (gilding) then the following condition issues can be tackled by a competent handyman or woman:
- Dirt, grime and grease
- Warped frame rails
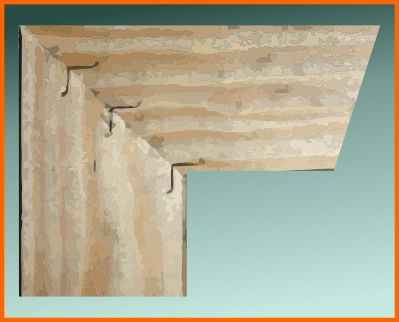
- Separated corners (miter joints)
- Delaminated & missing veneer
- Missing gesso or wood
- Worn gilded or painted surfaces
As an Amazon Associate, I earn from qualifying purchases.
Examine the frame to evaluate the damage
Use commonsense: small photo frames are so inexpensive that they are not worth restoring unless there are made of a valuable material like silver. Larger frames can sometimes be too badly damaged for economical repair. If the frame is warped or seriously damaged by smoke or water – throw it in the garbage. Otherwise, follow the restoration steps outlined in this post.
Clean the frame
Antique frames, especially ornate decorative ones with carving or ornate gesso, generally accumulate layers of dirt over the years. Before fixing the damage it is important to clean the frame thoroughly.
Careful cleaning will often reveal the gleaming original condition.
Removing loose dust
Start by wiping off the dust with a microfiber cloth. Then, taking great care not to damage the finish, use a soft toothbrush or Q-tip to get into the cavities. If you have a small vacuum cleaner you can suck up dust but put a filter over the nozzle to avoid detaching loose chips of gesso or wood.
Cleaning with liquids
Grease or dirt needs to be dissolved from the frame surface and the key advice is to always test cleaning fluid on an inconspicuous part of the frame first. Water, with conservation detergent or dish soap, is often effective when applied with a Q-tip or cotton balls, but never use too much – waterlogged wood is not good!
Lemon oil polish and cleaner is a great way to restore dirty wooden frames but remember to test before using.
Study the frame materials and choose suitable cleaning agents. Silver polish, for example, is great for many metal frames. Never use abrasive cleaners or strong chemicals like ammonia or acetone without very careful testing.
Straightening a warped frame
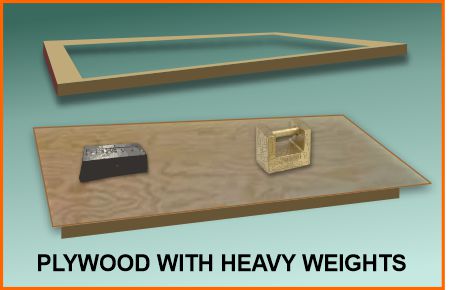
Warping of solid wood frames is caused by temperature and humidity variations. If you have a special affection for the frame it can sometimes be rescued by soaking the wood with wet rags and flattening it under a sheet of weighted plywood. Keep the rags wet and gravity will gradually straighten out the frame.
Repairing loose corners
If the corner joints are loose the frame must be taken apart and re-glued. Mark each side so you will know how the pieces fit back together, then separate them using a rubber mallet. You may need to detach the corners with a putty knife, but be careful not to mar the finish.
After removing staples or nails, chip away the old glue and sand the 45-degree joints to get back to bare wood. Then use the picture framer’s trick of sizing the end grain joints with watered-down wood glue (50-50 water and glue).
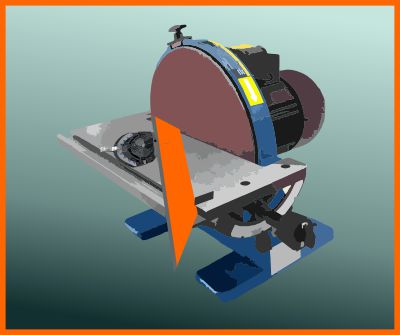
Framer’s hack, using a disc sander, set at 45 degrees, to finesse the miter angles correctly and remove the old adhesive.
The end-grain of wood sucks up glue – so use a 50-50 mixture of water and wood glue to seal the grain. Allow this to dry before applying full-strength glue.
Clamping and gluing the frame
If you don’t have picture framer’s corner clamps, you can use bar clamps arranged at right-angles as shown below:
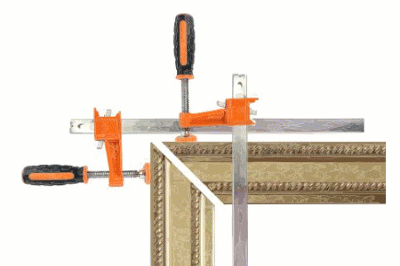
Apply woodworkers yellow glue to both miters, clamp and squeeze together. Wipe off the excess glue before it dries to save clean-up time.
Several inexpensive clamping systems are available and our favorite is the Powertec brand of band clamp:

Ratcheting Bar Clamps: even if you are not planning to take up framing, this highly-rated band clamp is worth buying. available from Amazon in two sizes, this clamp is ideal for gluing picture frames, furniture, shelves, and other workpieces.
Numerous specialist framer’s clamps are available: Artistry in Glass recommends this model from Housolution:
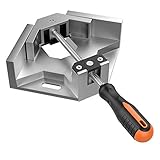
90° clamp for woodworking with an adjustable swing jaw. The clamp is made of die-cast aluminum alloy. It allows two frame pieces of different thicknesses to be joined at a 90-degree angle. The maximum clamping range is approx. 2.68in; jaw width: 3.74in; jaw depth: 1.4in, it can clamp materials like steel, metal tube, wood, gesso, & plastic.
Reinforcing glued miter joints
Even though the glued joints are strong it is best to reinforce the corners with mechanical fastenings:

If you have a brad nailer in your toolbox a simple way to secure the miters is to shoot a couple of brads into the corner of the frame.
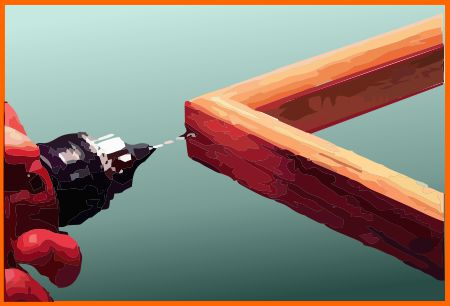
A hand-hammered brad is a good way to secure the corner. With hard-wood frames drill a pilot hole.
V-nails are used by professional framers to reinforce the corners but they require expensive tools like this top-rated nailer available on Amazon.
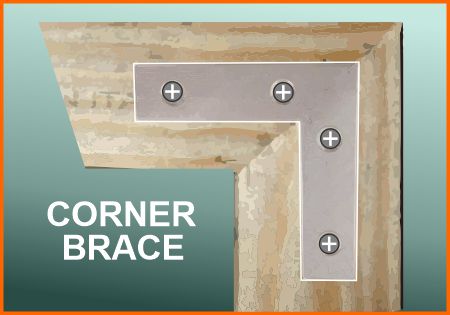
Metal L-shaped braces are a simple way to secure the corners. Attached to the back of the frame they don’t show when the picture is on the wall. Choose screws with care so they do not go through to the front.
Corner braces may not work on very thin moldings because the screws can split the wood, but they are excellent for heavy picture frames. The braces come in brass and plated steel. Brass is best because it is less bulky and will not cause rust stains.
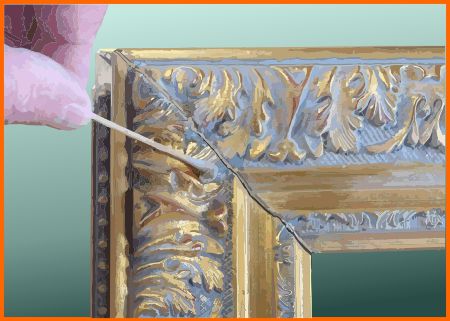
Repairing corners without taking them apart
In many old frames, the corners may have separated without coming apart. If there is only one loose corner, or if the separations are slight, you can sometimes re-glue without taking the entire frame apart.
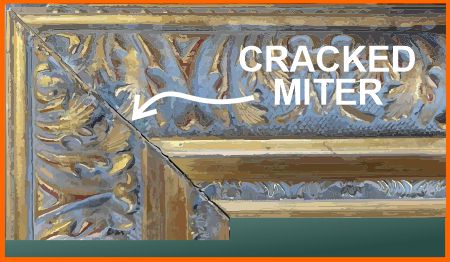
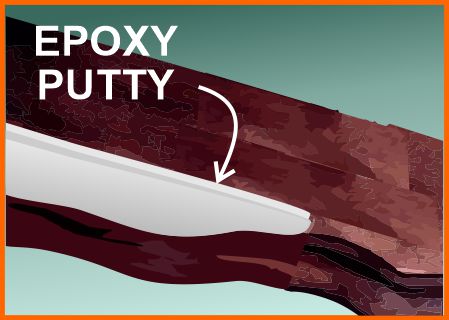
Study the corners and if possible open the joint just a little, scrape out as much of the old glue as you can, apply fresh glue, then clamp the joint closed. If the joint is still strong, just fill the hairline gap with epoxy putty and complete the repair as shown below.
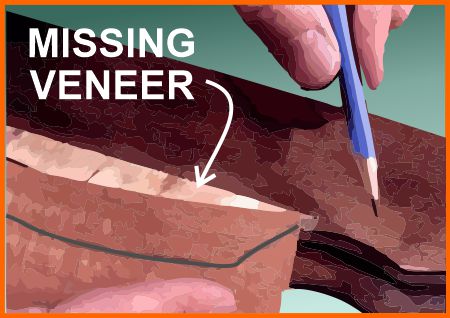
Delaminated veneers or inlays
One of the commonest types of damage is the delaminating of wood veneers that are applied as decorative finishes to the surface of wooden frames. Wood veneers and other inlays (mother of pearl, bone, enamel, etc) come loose because they expand at different rates compared to the substrate when subjected to high humidity or moisture.
Fixing badly damaged veneer is really a project for the experienced furniture re-finisher but a novice can easily make minor repairs. First, remove all the loose or damaged veneer then clean and sand the substrate to remove any old glue. Then, there are three main approaches:
Replace with real veneer
Carefully remove the damaged veneer and trim the missing areas to make a simple straight-edge shape for replacement. Clean the wood substrate to remove the old glue. Cut a new piece of matching veneer to fit and glue it in place. Finish by filling small gaps with wood filler, sanding then staining and polishing to match the original.
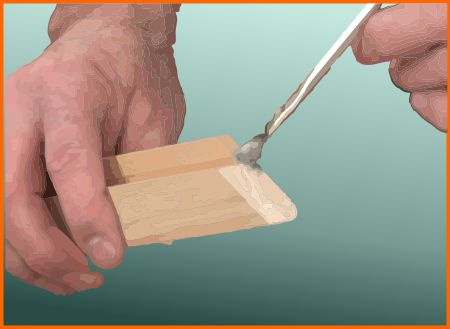
Fill with epoxy putty
If I don’t have replacement veneer, how do I repair a damaged picture frame?
To restore the missing veneer: remove the loose material, clean the substrate to remove the old glue, fill the space with epoxy putty or plastic wood, sand the putty, then paint or stain to match the original veneer.


Mohawk Finishing Products Epoxy Putty is available in numerous wood tones. It bonds to aluminum, glass, and wood, does not shrink, sets up in about one hour, and can be sanded and stained to match the missing veneer.
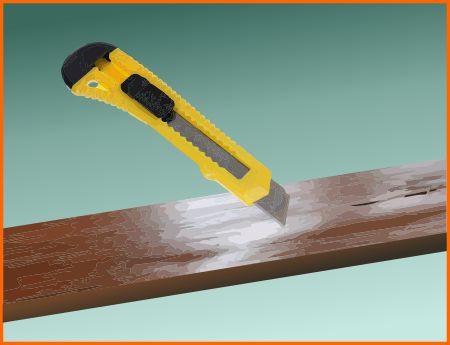
As an alternative to using veneer: fill the missing areas with epoxy putty, plastic wood, or suitable filler like Mohawk epoxy putty. This is good for small areas and easier to apply than veneer. The stages are: squidge on the putty and mold it flat with a palette knife (the smoother you get the putty, the less sanding you will have to do). Then sand the dried putty and stain or paint it to match the old veneer.
Puncture blistered veneer and re-glue
Sometimes veneer blisters without becoming detached. In this case, the best strategy is to puncture the blister by cutting a small slit with a sharp utility knife. Introduce a little wood glue into the slit and flatten the blister with a warm iron.
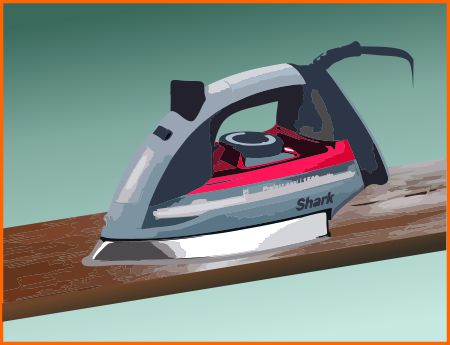
Iron with care, place protective cotton fabric under the iron if you are nervous.
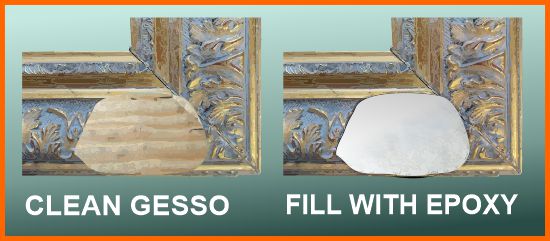
Replace missing gesso & decorative elements
The most common damage to a decorative frame is missing ornamental elements – chiefly gesso but also carved wood. Gesso is a mixture of chalk, white pigment, and animal glue that is molded to form ornate, three-dimensional decorations on traditional frames. It is covered by red-colored clay called “bole” before being gilded with gold leaf.
Gesso is very brittle and easily broken off when subjected to stress. Complete repair, including gold-leafing, is the province of restoration experts but, do not be afraid. Very acceptable fixes can be done by the handy homeowner. The main steps are:
- Remove loose gesso & save the pieces for re-gluing
- Clean the wooden substrate
- Make a mold from an undamaged area
- Fill the missing area with epoxy putty
- Use the mold to imprint the epoxy
- Sand, paint and gold-leaf to match the original
Many frames have cracked and loose gesso. Carefully detach the loose pieces, clean the substrate and glue the pieces back using wood glue. Fill any small cracks with epoxy putty.
Making a mold
To recreate complex 3-D decorations you need to make a mold and cast the replacement piece. So two items are needed: mold-making materials and epoxy putty or Plaster of Paris to cast into the mold.
There are two main types of mold – flexible silicone-based molds (Amazon) and hard, clay, or epoxy-based molds. We recommend hard molds made from a 2-part epoxy putty such as “Epoxy-Sculpt” (we also use this for filling the mold).
Mix the epoxy putty and press it firmly into an undamaged area of the frame that has the decoration that you wish to duplicate. When the putty is dry your mold is ready and can be removed. (Air-drying modeling clay, available here on Amazon, can also be used but is not as strong as the epoxy).
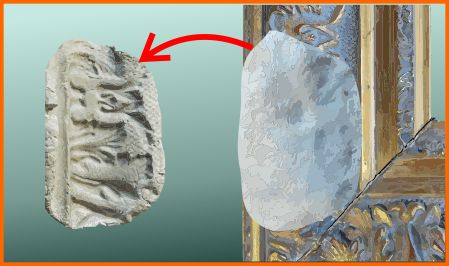
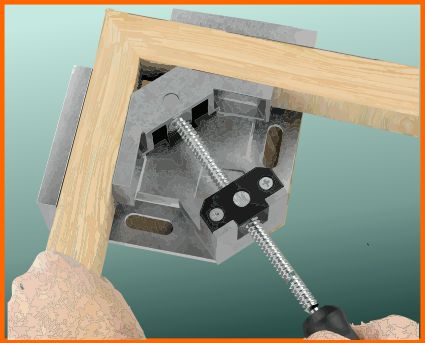
If you use a flexible mold, you have to take the cast material and carefully sculpt it to fit back in the frame. With a hard mold, the replacement putty can be added to the frame and imprinted in-situ as shown in the drawings below:
Prepare by removing all glue and dirt from under the detached gesso. Sand the wood to create a rough surface for the epoxy to stick to. Then fill the space with 2-part epoxy putty (we like Epoxy-Sculpt available here on Amazon). Traditionists can also use Plaster of Paris.
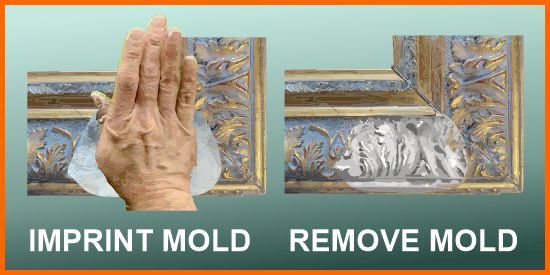
Using your hard epoxy mold, line it up with the frame decoration and press down firmly to imprint the design. (Dust the mold with a little corn starch or talcum powder so the putty does not stick).
Finishing – painting & gilding
The final stage in your epic gesso repair adventure is to gild the putty to match the original. First, check the newly molded material, fill any gaps with new putty, and then sand it smooth ready for gilding.
Most traditional gesso has an undercoat of red “bole” that gives a subtle warm, sub-color to the gold. Simulate this finish by painting with red-brown acrylic paint. Then purchase an inexpensive gilding kit from this page on Amazon and follow the instructions to complete your repair masterpiece.
Restoring carved wooden decorative elements
Solid wood frames are also embellished with 3-D decoration mainly created by carving. Carved wood dries out and becomes brittle if not correctly preserved by oiling and pieces often break and fall off. Repairs can be made using the same methods used for replacing missing gesso – except that the finishing is by wood staining rather than gilding.
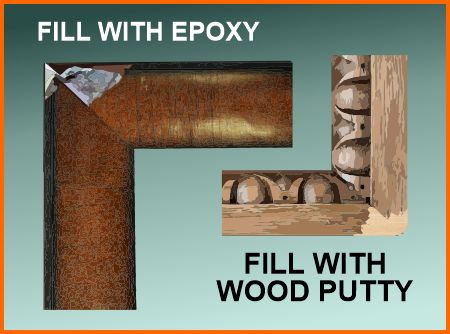
Simple wooden frames are repaired in the same way as for gesso. Clean off loose fragments, fill with epoxy putty or wood filler, sand smooth then paint or stain to match.
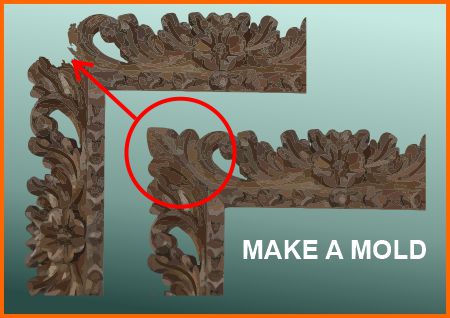
Elaborate 3-D carved frames with missing wood will require that you make a mold from an identical, undamaged area of the frame. In the case shown above, the newly cast epoxy part must be carefully sanded and modeled to fit back in the damaged corner. Consult the professionals at Artistry in Glass if you feel that this type of project is beyond your capabilities.
Worn gilded or painted surfaces
Antique picture frames often show normal wear and tear with age and gilding can easily be rejuvenated by applying new gold leaf. Do not be afraid – follow the instructions given in gilding kits shown on this Amazon page, and have fun making your old frames gleam like new!
If you are nervous about tackling real gilding, acceptable results can be obtained by using some of the wide range of gold paints now available on Amazon.
Explore estate sales and yard sales for beautiful frames!
Armed with the knowledge explained in this post, you can confidently explore yard sales looking for hidden treasures. You will have the confidence to make small repairs to bring an antique frame back to life at a fraction of the cost of a new one. You will also assist in the noble project of reducing your carbon footprint.
Unique Mirror Resources from Artistry in Glass
Mirror Design & layout
- How are mirrors made?
- What is a beveled mirror?
- What is a two-way mirror?
- Best mirrors for bedrooms
- How to size and position your wall mirror
- How to order custom etched mirrors
- Best places to hang dining room mirrors
- How much do wall mirrors cost?
- Shop the MIRROR Family Package
Mirror Installation & Removal
- How to hang a wall mirror
- How to frame a builder’s grade bathroom mirror
- How to hang a frameless mirror with glue
- Best clips for hanging mirrors
- How to attach a mirror to a closet door
- How to remove a mirror glued to the wall
Mirror Repair & Restoration
- Should I resilver my antique mirror?
- Can I repair scratched mirror silvering?
- What is the best spray paint for mirror silvering?
- How to fix a cracked mirror
- How to repair a broken mirror frame
Artistry in Glass was your source for antique repair in Tucson
Check out this amazing selection of informative articles:-
- Where can I get antiques repaired?
- Are broken antiques worth fixing?
- How to fix a broken picture frame
- How to repair a broken china plate
- How to repair a broken china teapot
- How to fix a broken marble slab
- How to repair a broken china coffee mug
- How to repair a 2000-year-old sculpture
- All about repairing stained-glass lampshades
- How to care for your stained glass skylight
- How to repair Dalle de Verre
- Is stained glass worth repairing?
- To repair or toss out?
- Tucson crystal & china repair a division of Artistry in Glass
- What to do with broken antiques
- Is lead crystal dangerous?
- Repairing an antique Mexican statue
- Repairing religious statues
- The history of Swarovski crystal figurines
- How to find the value of a Swarovski Crystal figurine
- Have Swarovski crystal figurines lost value since 2009?
- How to collect Swarovski annual ornaments
- How to display Swarovski crystal figurines
- How to authenticate a Swarovski crystal figurine
- How to display Swarovski annual ornaments
- How to clean Swarovski crystal figurines
- How to repair a Swarovski crystal mouse
- How to repair a Swarovski annual ornament
- How to repair a Swarovski crystal train set
- Fixing broken wine glass stems
- How to clean cloudy glasses
- Why do wine glasses have stems?
- Swarovski Crystal Figurines
- How to repair a chip in a wine glass
- How to fix a scratched glass tabletop
- How to replace a broken patio tabletop