
Many large mirrors are attached by an adhesive called mastic and are difficult to remove from the wall. Using safety goggles, gloves, and protective clothing, follow these simple steps – apply duct tape in case of breakage, soften the glue with a heat gun, and carefully separate the mirror from the wall using cut-out wire, or wooden shims, then pull the mirror away from the wall.
It is easy to smash mirrors, creating dangerous shards, and earning seven years of bad luck (irrational superstition). This website explains ways to remove wall mirrors safely and without breakage.

Important safety information. Mirrors can be dangerous and even life-threatening so always use safety equipment and when in doubt, consult a licensed glass professional
Artistry in glass cannot be held responsible for actions taken based on the information given on this website. Please seek professional help if you are in any doubt.
Artistry in Glass is an Amazon Associate – we earn from qualifying purchases. There is no cost to you.
Consider your options before you start!
Mirrored walls were very popular in the 1970s through the 1990s, creating an ultra-modern or deco look, but are now somewhat out of style. You may wish they were gone but, study this post and bear in mind that a considerable amount of work is involved and a great deal of damage is done to the underlying drywall during mirror removal. Consider decorative options before you embark on a costly mirror demolition project.
General precautions for mirror removal
For all removal projects, it’s a good idea to spread out a drop cloth or other form of protection below the mirror. Secondly, unless it is obvious that the mirror will detach very easily, it’s best to apply masking tape so that, if the mirror does crack, you will be protected from dangerous shards. Duct tape will hold the broken pieces together.
Important safety equipment

Tools for mirror removal

The essential tools for mirror removal include a hammer or mallet, pry bars, wooden shims, and a utility knife. In some cases, additional tools are useful:-

Optional tools that are helpful in some mirror removals include cut-out wire (available from an auto-parts store) and a heat gun (to soften the adhesive).
Easy and difficult mirror removals
Each mirror removal project is different. Some mirrors are very firmly glued to the wall with lots of adhesive (called mirror mastic) while others come away very easily. If your mirror has three sides accessible (below left) it is easier to remove than a mirror installed flush to the sidewalls (below right).

In either situation (easy or difficult) the image below gives you a preview of what the mastic (glue) will look like when you finally remove the mirror.

Easy mirror removal – three sides accessible
If the sides of the mirror are accessible, as well as the top, the removal is generally easier because shims or pry bars can attack three sides of the mirror. Follow these steps to remove your mirror:
Step 1: Remove any mirror clips that might be holding the mirror in place.

Step 2: Apply duct tape to the mirror. This is a safety measure to protect you from dangerous shards if the mirror breaks. The duct tape will hold the glass together.

Optional step: use a heat gun to soften the adhesive.
It is probably not worth buying one especially but if you have a heat gun in your toolbox, or a hair drier available, this step is worth a try.

A heat gun can really help but needs to be used with care. Keep the gun 18 inches away from the mirror and keep it moving constantly to avoid cracking the mirror. Apply heat for at least 20 minutes for best results.
Step 3: use wooden shims and/or pry-bars, to gradually release the mirror from the wall.


Pry bars or wooden shims?
Use your common sense to decide between shims or a pry-bar – or use both methods. Protect the drywall and get extra leverage with a scrap of wood behind the bar.

Optional method – cut-out wire
If shims are difficult to insert, cut-out wire sometimes works. Make your own using piano wire with dowel handles or order from Amazon. Backward and forward sawing, cuts through the adhesive. The wire should be 12 – 18 inches longer than the width of the mirror.
Step 4: remove the mirror. If the pry-bars and wooden shims have released the top edge of the mirror enough to allow your fingers to grip, carefully pull the mirror (use gloves) away from the wall. You will hear the sound of tearing as the mastic removes the paper from the drywall. With large mirrors, always have a co-worker to help you in case the mirror releases suddenly.

Remember that mirror is very heavy. A 1/4″ (standard thickness) mirror 6 feet wide by 4 feet tall weighs over 80 lbs. (plus the weight of any attached mastic). Get help to handle large mirrors safely.
How do you remove a mirror that is glued to a door?
A mirror glued to a door is more likely to be attached by double-sided tape than with heavy black mastic. To remove the mirror first detach any mirror clips, then use a heat gun to soften the tape or adhesive. Then insert wooden shims or a prybar between the mirror and the door and try to release the mirror, Finally, using gloves, pull carefully on the mirror to detach it from the door.
Difficult mirror removal
If your mirror is jammed in, flush with the left and right walls, it will be more difficult to remove because only one side is accessible to shims and pry bars.
First, follow the steps for “easy” removal outlined above. Apply duct tape for safety, soften the mastic using a heat gun or hairdryer, and try to insert wooden shims or a pry-bar behind the top (exposed) edge of the mirror.

Check for silicone or caulking at the sides.
Using your utility knife, be sure to release any silicone that might be gluing the mirror to the side walls.
If the mirror is stuck and will not release from the wall it may be necessary to crack it. The best way is to use a glass cutter to create a straight, vertical break as shown below.

Notice the location of the two wooden shims in the drawing above. They are positioned on either side of the scoreline to create tension in the slightly bowed-out glass and enable the cut to run.
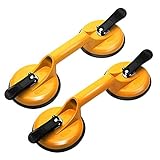
Use suctions cups
If it is not possible to get your gloved hands behind the glass, use suction cups to pull the mirror away from the wall. Suction cups are affordable and very useful for handling heavy sheets of mirror or glass.
Can you cut a mirror that is glued to the wall?

It is not possible to cut a mirror that is completely glued to a wall. In order to cut glass, two steps are necessary: first, the glass surface (not the mirrored back!) must be scored with a glass cutter. Then the score must be broken or “run“. This is done by applying pressure opposite the score line – as shown above/left. So the mirror must be at least partially detached from the wall to apply the required pressure.
Repairing the drywall
After successfully removing a large wall mirror your drywall or sheetrock will be a mess. Black tarry mastic either remains stuck to the mirror with the top paper surface of the drywall attached, or it might have released from the mirror and remain stuck to the wall.
In any event, you will need to remove the old mastic and repair the damage to the drywall. Use tools like these pictured below and learn from sites like these to fix the damaged sheetrock.

Alternatives to mirror removal
As this post has shown, removing large wall mirrors can be difficult and even dangerous. Furthermore, the process always results in expensive damage to the underlying drywall. So, before you begin, consider these decorative alternatives:
- Paint the mirror with a stencil
- Cover the mirror with curtains
- Overlay with a picture frame
- Hang artwork from the ceiling

How to install wall mirrors
Learn all you need to know about wall mirrors.
Artistry in Glass specializes in restorations of all types
As an Amazon Associate, I earn from qualifying purchases.
Unique Mirror Resources from Artistry in Glass
Mirror Design & layout
- How are mirrors made?
- What is a beveled mirror?
- What is a two-way mirror?
- Best mirrors for bedrooms
- How to size and position your wall mirror
- How to order custom etched mirrors
- Best places to hang dining room mirrors
- How much do wall mirrors cost?
- Shop the MIRROR Family Package
Mirror Installation & Removal
- How to hang a wall mirror
- How to frame a builder’s grade bathroom mirror
- How to hang a frameless mirror with glue
- Best clips for hanging mirrors
- How to attach a mirror to a closet door
- How to remove a mirror glued to the wall
Mirror Repair & Restoration
- Should I resilver my antique mirror?
- Can I repair scratched mirror silvering?
- What is the best spray paint for mirror silvering?
- How to fix a cracked mirror
- How to repair a broken mirror frame
Artistry in Glass was your source for antique repair in Tucson
Check out this amazing selection of informative articles:-
- Where can I get antiques repaired?
- Are broken antiques worth fixing?
- How to fix a broken picture frame
- How to repair a broken china plate
- How to repair a broken china teapot
- How to fix a broken marble slab
- How to repair a broken china coffee mug
- How to repair a 2000-year-old sculpture
- All about repairing stained-glass lampshades
- How to care for your stained glass skylight
- How to repair Dalle de Verre
- Is stained glass worth repairing?
- To repair or toss out?
- Tucson crystal & china repair a division of Artistry in Glass
- What to do with broken antiques
- Is lead crystal dangerous?
- Repairing an antique Mexican statue
- Repairing religious statues
- The history of Swarovski crystal figurines
- How to find the value of a Swarovski Crystal figurine
- Have Swarovski crystal figurines lost value since 2009?
- How to collect Swarovski annual ornaments
- How to display Swarovski crystal figurines
- How to authenticate a Swarovski crystal figurine
- How to display Swarovski annual ornaments
- How to clean Swarovski crystal figurines
- How to repair a Swarovski crystal mouse
- How to repair a Swarovski annual ornament
- How to repair a Swarovski crystal train set
- Fixing broken wine glass stems
- How to clean cloudy glasses
- Why do wine glasses have stems?
- Swarovski Crystal Figurines
- How to repair a chip in a wine glass
- How to fix a scratched glass tabletop
- How to replace a broken patio tabletop