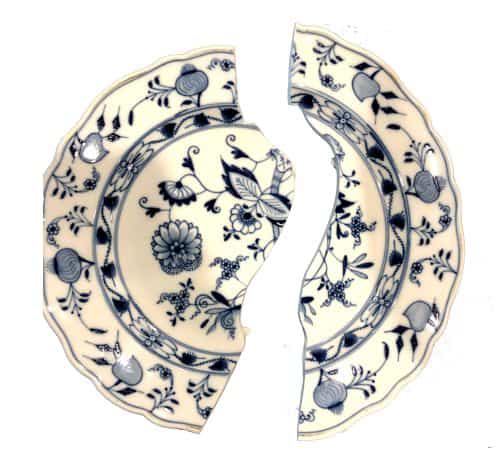
Breaking a precious china or ceramic plate can be a traumatic event causing great sadness and remorse. Fortunately, a plate, broken into 2 or 3 pieces, can be repaired by a competent non-professional following these steps:-
- Examine the pieces to make sure they are perfectly clean with no dirt or old glue.
- Support the lower piece in a sandbox so the upper piece balances ready for gluing.
- Apply a very thin coat of 2-part epoxy adhesive to one broken edge.
- Bring the two pieces together tightly to squeeze out excess glue.
- Balance the two halves and wait for the glue to set up.
- Clean off excess adhesive.
As an Amazon Associate, I earn from qualifying purchases.
Important steps in the repair of a china plate
A large number of factors are involved in the repair of a broken china or ceramic plate. But first, it’s very important to understand that restored china cannot be used for serving food – the piece becomes a display item for the china cabinet.
This post will explain which types of repair can be tackled by the competent amateur, which repairs are best left to the professional, and, finally which repairs are uneconomical and not worth attempting.
Follow the steps below to repair your china plate.
Step 1: Identify the material
It is important to identify the type of ceramic (china, bone china, stoneware, earthenware, terracotta, or common pottery) in order to choose the best ways to clean and glue the broken plate.
[drawattention ID=”4416″]
This post will describe the repair of plates made of china or bone china – that is, made of non-porous, vitreous ceramic – commonly referred to as porcelain in Europe. Other posts on this website will cover other types of repair offered by Artistry in Glass
To figure out if the plate can be repaired, first examine and count the pieces.
Step 2: Carefully examine the pieces
Before attempting a repair, make sure that all the pieces fit together and check that there are no pieces missing (check under the sofa or refrigerator!) Our experience has shown that 2 or 3 pieces can successfully be glued together by an amateur but more experience and skill is required when there are a large number of pieces.

[drawattention ID=”4420″]
A plate with multiple breaks is only worth fixing if it is of significant sentimental value. The number of pieces complicates the repair process – in detail, a carefully designed gluing order has to be determined to avoid “locking out” (getting to a piece that cannot be inserted). The process requires a degree of experience and expertise only possessed by professionals – contact Artistry in Glass.
Is the plate worth repairing?
Remembering that the repaired plate cannot be used for food the two questions that must be asked are:
1) is the item sufficiently important from a sentimental point of view to justify repair. In other words, was it brought over on the Titanic by your great-grandmother?
2) if the broken plate is part of your favorite dinner service – the best solution is to search for the pattern on a service like Replacements or on eBay.
Step 3: Examine the broken edges
It is very important that the broken edges are all perfectly clean before gluing. Even the tiniest impurity, a molecule of dirt, or a trace of old adhesive will prevent a perfect join.
[drawattention ID=”4423″]
Step 4: Clean the china
Importance of removing grease and dirt
There is no more important step than making sure the plate is perfectly clean. The main reason is that grease attracts dirt, and dirt creates the unsightly black line on the join – a tell-tale sign that the repair was done by an amateur. Remember that even if you clean the pieces carefully, they can easily pick up dust from your fingers and the atmosphere. Then when you complete the repair and see the dreaded black line, you will be tempted to blame the glue whereas, in reality, it is grease and dust from your own hands that has caused the problem.
[drawattention ID=”4431″]
Cleaning the china plate
If you are uncertain, always test a small area on the plate with water or any solvent, to make sure the design will not be affected. If you have correctly identified the plate as non-porous china, most grease and dirt is easily removed by washing the plate in warm water with a few drops of detergent. Make sure you do not submerge valuable and porous Indian Pottery in water – it will dissolve!
In the case of stubborn grease and dirt, submerge the plate in warm water with biological laundry detergent (like Ecos, or Tide Pureclean), if necessary with water softener. Leave it to soak for 2-4 hours, periodically brushing the edges gently with a soft-bristle brush. Repeat and, if necessary, make another solution and leave overnight. Once all the dirt is removed, rinse off the edges with rubbing alcohol to remove soap scum and cover the cleaned pieces with a clean cloth or paper towels until they are ready to be glued.
Glue from a previous repair
Different adhesives need different solvents for removal. In practice, a combination of dissolving and picking or cutting away the old glue with a scalpel or Exacto-knife is the best approach. Superglue (cyanoacrylates) dissolve in acetone and rubber cement needs a commercial paint-stripper. Epoxies will loosen with heat but need a strong product like Attack Epoxy Adhesive remover for dissolving although Goof off of Goo Gone can sometimes be effective. In all cases, be sure to test an inconspicuous small area before proceeding and take care to read instructions, and follow safety precautions when using strong chemicals.
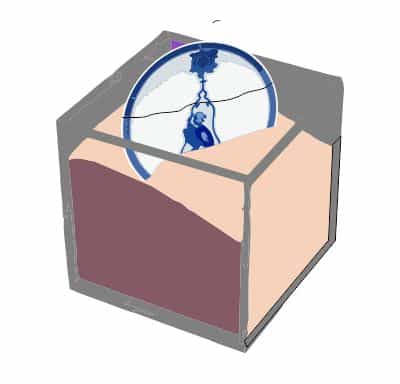
Step 5: Balance the plate
One of the most underestimated and yet important steps in the gluing process is to design a support system to hold the pieces in place while the glue sets up. Even a teetotaller with the steadiest hand will find it hard to hold two pieces of china perfectly still for 3 or 4 minutes and the slightest micro-movement will ruin the glue bond and mean that you will have to start all over, cleaning the edges (acetone will clean off uncured epoxy).
[drawattention ID=”4438″]
Step 6: Apply the adhesive
A large number of adhesives will work on china and every restorer seems to have his or her favorite. There is unanimous agreement that 2-part epoxies have the best combination of high strength and enough setup time to adjust the broken pieces to the correct positions. A future post will give more information on epoxies but two types can be distinguished: extra slow curing like “Araldite” which has a 90 minute working time and is suitable for complicated gluing jobs that require lots of time for adjustment. The best choice for our simple 2- or 3-piece gluing job is any number of fast-curing clear epoxies that set up in 3 to 5 minutes.
[drawattention ID=”4443″]
Because china is vitreous (non porous) no glue soaks into the body of the plate. For this reason, the best bond is achieved with a thin layer of glue on one surface only. Most amateurs use far too much glue. Mix the 2-part adhesive thoroughly and apply to one surface only using a toothpick. Apply the glue to the center of the edge using just enough to ensure the resin will spread over the whole area without oozing out when the pieces are joined.
Step 7: Join the pieces
Align the two fragments as best you can and ease them together searching, by feel, for the exact alignment – a “clicking” into position. Press firmly together making sure you do not misdirect the pressure causing the pieces to jump or hinge apart, possibly resulting in chipping or damage of the edges.
Check the alignment by stroking your fingernail or a toothpick over the join-line to make sure there is no step or mismatch. When you are happy with the positioning, stretch several strips of adhesive tape across the join to increase the pressure and further stabilize the join, then balance the plate in the sandbox.
[drawattention ID=”4444″]
Some careful restorers place a little cling film under the plate to prevent sand from contaminating the work.
Step 8: Clean off the excess adhesive
Epoxies increase in strength over time, becoming fully cured in 12 hours or so leave the plate to setup overnight before removing it for final cleaning.
[drawattention ID=”4453″]
If glued correctly, the resulting join will be as strong, or even stronger, than the china and your precious plate can be safely displayed for many more years. Providing you have followed the cleaning procedures, the join will also be barely visible.
There is one further, advanced gluing, technique that takes advantage of capillary action and is described below.
A Sprung Crack or Break Cannot be Repaired!
It occasionally happens that a stress crack will form in china that was not correctly annealed in the kiln during the manufacturing process. An impact or excessive temperature change may result in crack as energy is released and where the two sides do not line up. This type of “sprung” crack may be partial, as in the image below, or complete. By doing a careful dry-run, a sprung crack can be identified if the two halves will not join together perfectly. This type of damage is very difficult or impossible to fix.
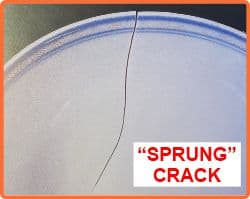
Stresses, frozen into the ceramic during inadequate annealing in the kiln, are released by subsequent stresses – causing what is known as a sprung crack. Even with specialized clamps, these cracks are very hard to repair.
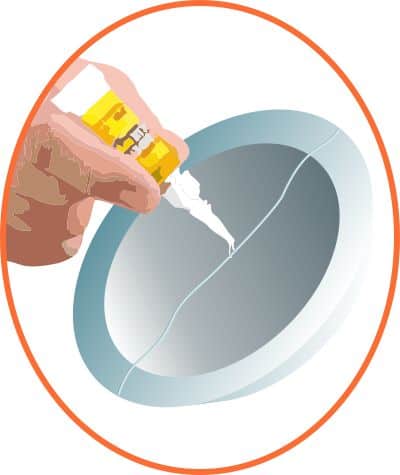
Advanced gluing techniques
It is sometimes possible to use the capillary gluing method to simplify the whole gluing process. The method uses a very low viscosity (very runny) and expensive epoxy called HXTAL NYL-1 that is widely used by professional conservators because it is guaranteed not to yellow with age and is very strong. (It was famously used by the British Museum to restore the legendary Roman, Portland Vase). The broken pieces are taped together firmly and the HXTAL resin is introduced into the break by capillary action. The benefit is that numerous small pieces can be “jigsawed” together and taped in place so that there are no gaps and mismatches during gluing.
This capillary system also works with a very runny superglue where the resulting bond is not as strong as epoxy but is sufficient for a display piece. However, superglue is not recommended generally for china repair because it is not as strong as epoxy and it sets almost instantly – leaving no time for positioning. Obviously, if you glue a piece incorrectly you will waste a considerable amount of time (and risk potential damage) in ungluing and cleaning.
If you have followed the instructions in this post, you will have made a strong and almost invisible repair to your precious china plate. While not available for serving food, it should be an excellent addition to your china cabinet and your precious memories will have been restored.
Only one possible problem remains – filling and painting small chips, micro-fractures, and dings.
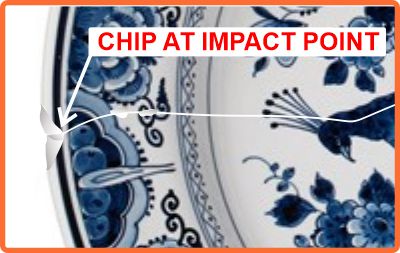
Filling and painting chips
When china breaks there is nearly always a chip at the point of impact. The small chip fragments are often either lost or too small to glue back – so the chip has to be filled and painted.
Filling and painting is a time-consuming job and will be explained in a future Artistry in Glass blog post.
Tucson residents – trust Artistry in Glass for all your repair needs
Artistry in Glass has been restoring precious antiques in Tucson since 1986 under our repair division “Tucson Crystal and China Repair” – check out this video to get an idea of the things we can fix:
Take a look at what are customers are saying about Artistry in Glass
Conclusions
China plates that are treasured family heirlooms can be successfully repaired by the amateur following the steps in this post.
However, the repaired plate cannot be used for serving food and so if you need to replace part of your dinner service – determine the pattern from the marks on the base and google it on eBay or Replacements to look for a replacement piece.
Can a broken china plate be repaired with milk?
An urban legend promoted on numerous YouTube videos claims that broken china can be fixed by being immersed in warm milk for two days. Highly dubious videos show cracked plates being taped together and coming out as good as new: is this true?
There is no evidence that broken china plates can be satisfactorily repaired with milk. Numerous YouTube videos have debunked this urban legend. It is possible that fine cracks can be filled with the casein component of milk to stop or mitigate leaks in ceramics vessels like bowls and teapots.
The pseudo-scientific justification links the gooey component of milk called casein (formerly used as the basis for a type of wood glue) to the purported adhesive effects, but the majority of videos show that the method is ineffective. We conclude that the YouTube videos showing positive results have been made with camera tricks.
Artistry in Glass is your source for antique repair in Tucson
Check out this amazing selection of informative articles:-
- Where can I get antiques repaired?
- Are broken antiques worth fixing?
- How to fix a broken picture frame
- How to repair a broken china plate
- How to repair a broken china teapot
- How to fix a broken marble slab
- How to repair a broken china coffee mug
- How to repair a 2000-year-old sculpture
- All about repairing stained-glass lampshades
- How to care for your stained glass skylight
- How to repair Dalle de Verre
- Is stained glass worth repairing?
- To repair or toss out?
- Tucson crystal & china repair a division of Artistry in Glass
- What to do with broken antiques
- Is lead crystal dangerous?
- Repairing an antique Mexican statue
- Repairing religious statues
- The history of Swarovski crystal figurines
- How to find the value of a Swarovski Crystal figurine
- Have Swarovski crystal figurines lost value since 2009?
- How to collect Swarovski annual ornaments
- How to display Swarovski crystal figurines
- How to authenticate a Swarovski crystal figurine
- How to display Swarovski annual ornaments
- How to clean Swarovski crystal figurines
- How to repair a Swarovski crystal mouse
- How to repair a Swarovski annual ornament
- How to repair a Swarovski crystal train set
- Fixing broken wine glass stems
- How to clean cloudy glasses
- Why do wine glasses have stems?
- Swarovski Crystal Figurines
- How to repair a chip in a wine glass
- How to fix a scratched glass tabletop
- How to replace a broken patio tabletop
As an Amazon Associate, I earn from qualifying purchases.